텐서플로우 자격증 준비를 위한 공부를 하려고 합니다.
시험 문제 유형은 아래와 같으며 coursera와 udacity 강의를 보고 준비하려고 합니다.
-
Category 1: Basic / Simple model
-
Category 2: Model from learning dataset
-
Category 3: Convolutional Neural Network with real-world image dataset
-
Category 4: NLP Text Classification with real-world text dataset
-
Category 5: Sequence Model with real-world numeric dataset
www.udacity.com/course/intro-to-tensorflow-for-deep-learning--ud187
Intro to TensorFlow for Deep Learning | Udacity Free Courses
Developed by Google and Udacity, this course teaches a practical approach to deep learning for software developers.
www.udacity.com
www.coursera.org/learn/introduction-tensorflow/home/welcome
Coursera | Online Courses & Credentials From Top Educators. Join for Free | Coursera
Learn online and earn valuable credentials from top universities like Yale, Michigan, Stanford, and leading companies like Google and IBM. Join Coursera for free and transform your career with degrees, certificates, Specializations, & MOOCs in data science
www.coursera.org
Category 3: Convolutional Neural Network with real-world image dataset
www.tensorflow.org/datasets/catalog/horses_or_humans
horses_or_humans | TensorFlow Datasets
말과 인간의 큰 이미지 세트. 스플릿 예 'test' 256 'train' 1,027 FeaturesDict({ 'image': Image(shape=(300, 300, 3), dtype=tf.uint8), 'label': ClassLabel(shape=(), dtype=tf.int64, num_classes=2), }) @ONLINE {horses_or_humans, author = "Laurence
www.tensorflow.org
텐서플로우 데이터셋인 horsehorses_or_humans을 이용해서 간단한 cnn 모델 학습을 해보려고 합니다.
import tensorflow_datasets as tfds
import tensorflow as tf

import matplotlib.pyplot as plt
import numpy as np

%matplotlib inline
tfds를 이용하여 데이터 종류를 확인해보고 데이터를 불러오는 방법에 대해 말하겠습니다.
info를 통해서데이터셋의 크기를 확인한뒤에 steps_per_epoch 지정해 줄 수 있습니다.
#데이터 종류 확인
tfds.list_builders()[:10]

dataset, info = tfds.load(name='horses_or_humans', split=tfds.Split.TRAIN, with_info=True)
info
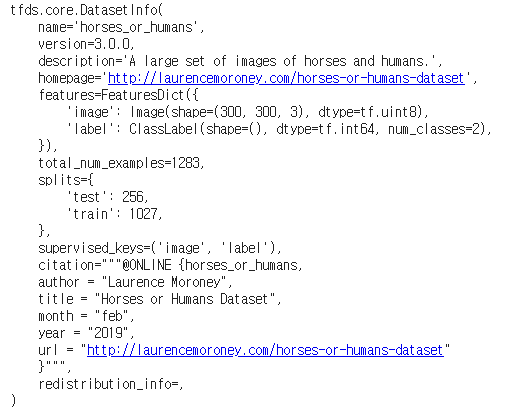
tfds.load를 이용해서 데이터를 쉽게 불러오고 확인해보겠습니다.
train_dataset = tfds.load(name="horses_or_humans", split=tfds.Split.TRAIN)

for data in train_dataset.take(1):
    image, label = data['image'], data['label']
    plt.imshow(image.numpy()[:, :, 0].astype(np.float32), cmap=plt.get_cmap("gray"))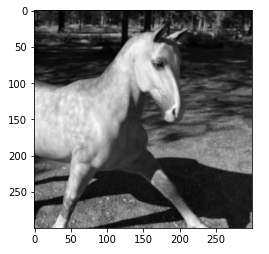
test_dataset = tfds.load("horses_or_humans", split=tfds.Split.TEST)
for data in test_dataset.take(1):
    image, label = data['image'], data['label']
    plt.imshow(image.numpy()[:, :, 0].astype(np.float32), cmap=plt.get_cmap("gray"))
url을 이용해서 데이터를 불러 올 수도 있습니다.
import urllib
import zipfile
url_train = "https://storage.googleapis.com/download.tensorflow.org/data/horse-or-human.zip"
url_test = "https://storage.googleapis.com/download.tensorflow.org/data/validation-horse-or-human.zip"

urllib.request.urlretrieve(url_train, 'horse-or-human.zip')
local_zip = 'horse-or-human.zip'
zip_ref = zipfile.ZipFile(local_zip, 'r')
zip_ref.extractall('tmp/horse-or-human/')
zip_ref.close()

urllib.request.urlretrieve(url_test, 'testdata.zip')
local_zip = 'testdata.zip'
zip_ref = zipfile.ZipFile(local_zip, 'r')
zip_ref.extractall('tmp/testdata/')
zip_ref.close()
ImageGenerator클래스를 사용해서 0~255의 픽셀값들을 0,1 사이로 조정한 다음 모든 이미즈의 크기를 300 x 300으로 바꿔줍니다. 그리도 다중분류의 경우 categorical또는 sparse를 사용하고 이진분류에서는 binary를 사용합니다.
from tensorflow.keras.preprocessing.image import ImageDataGenerator

train_datagenerator = ImageDataGenerator(rescale = 1/255)
validation_datagenerator = ImageDataGenerator(rescale = 1/255)

train_generator = train_datagenerator.flow_from_directory('tmp/horse-or-human/',
                                                    batch_size = 128,
                                                    class_mode = 'binary',
                                                    target_size = (300, 300))
validation_generator = validation_datagenerator.flow_from_directory('tmp/testdata/',
                                                              batch_size=32,
                                                              class_mode='binary',
                                                              target_size=(300, 300))

cnn-activation-pooling 과정을 통해서 이미지 부분의 주요한 Feature 들을 추출해 냅니다. cnn을 통해서 1개의 이미지를 필터를 거친 다수의 이미지를 출력합니다.Conv2D, MaxPooling 조합으로 층을 쌓고 Classification을 위한 softmax와 마지막 출력층의 갯수는 클래스의 갯수와 동일하게 맞춰줍니다.
model = tf.keras.models.Sequential([
                                    tf.keras.layers.Conv2D(16, (3, 3), activation='relu', input_shape=(300, 300, 3)),
                                    tf.keras.layers.MaxPooling2D(2, 2),
                                    tf.keras.layers.Conv2D(32, (3, 3), activation='relu'),
                                    tf.keras.layers.MaxPooling2D(2, 2),
                                    tf.keras.layers.Conv2D(64, (3, 3), activation='relu'),
                                    tf.keras.layers.MaxPooling2D(2, 2),
                                    tf.keras.layers.Conv2D(64, (3, 3), activation='relu'),
                                    tf.keras.layers.MaxPooling2D(2, 2),
                                    tf.keras.layers.Conv2D(64, (3, 3), activation='relu'),
                                    tf.keras.layers.MaxPooling2D(2, 2),
                                    tf.keras.layers.Flatten(),
                                    tf.keras.layers.Dense(512, activation='relu'),
                                    tf.keras.layers.Dense(1, activation='sigmoid')])

model.summary()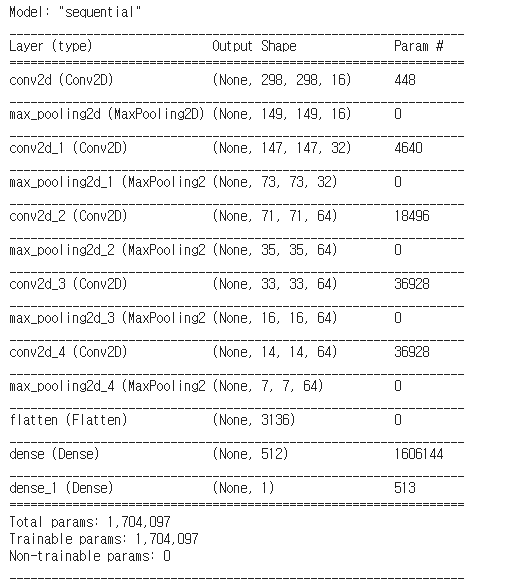
모델을 컴파일 할때 optimizer는 가장 최적화가 잘되는 알고리즘인 adam이 있지만 RMSprop를 이용하겠습니다
RMSProp을 사용할 때는 학습률을 제외한 모든 인자의 기본값을 사용하는 것이 권장되며 일반적으로 순환 신경망(Recurrent Neural Networks)의 옵티마이저로 많이 사용됩니다.
loss의 경우 출력층 activation이 sigmoid인 경우 binary_crossentropy를 사용하고
출력층 activation이 softmax인 경우
원핫인코딩이 되어있을 경우 categorical_crossentropy를
원핫인코딩이 되어있지 않을 경우 sparse_categorical_crossentropy를 사용합니다
여기서 ImageDataGenerator는 자동으로 라벨을 원핫인코딩 해줍니다.
from tensorflow.keras.optimizers import RMSprop
model.compile(loss='binary_crossentropy',
              optimizer=RMSprop(lr=0.001),
              metrics=['accuracy'])
모델을 학습시키기전에 callback checkpoint를 지정해주겠습니다. 체크포인트를 생성하는것은 val_loss 기준으로 epoch마다 최적의 모델을 저장하기 위해서 이고
checkpoint_path는 모델이 저장된 파일 명을 설정하는것입니다. 체크포인트를 만든 후에 학습을 진행하겠습니다.
checkpoint_path = 'best_performed_model.ckpt'
checkpoint = tf.keras.callbacks.ModelCheckpoint(checkpoint_path,
                                                save_weights_only=True,
                                                save_best_only=True,
                                                monitor='val_loss',
                                                verbose=1)
histroy = model.fit(train_generator,
steps_per_epoch = 8,
epochs = 15,
verbose = 1,
callbacks=[checkpoint],
validation_data = validation_generator,
validation_steps = 8)학습이 완료된 후에는 load_weights를 반드시 해줘야 합니다. 학습 결과를 시각화 해보겠습니다.
model.load_weights(checkpoint_path)plt.figure(figsize=(12,9))
plt.plot(np.arange(1,15+1), histroy.history['accuracy'])
plt.plot(np.arange(1,15+1), histroy.history['loss'])
plt.title('accuracy / loss')
plt.xlabel('epochs')
plt.ylabel('acc / loss')
plt.legend(['accuracy','loss'])
plt.show()
plt.figure(figsize=(8, 8))
plt.subplot(2, 1, 1)
plt.plot(histroy.history['accuracy'], label='Training Accuracy')
plt.plot(histroy.history['val_accuracy'], label='Validation Accuracy')
plt.ylim([0.8, 1])
plt.legend(loc='lower right')
plt.title('Training and Validation Accuracy')

plt.subplot(2, 1, 2)
plt.plot(histroy.history['loss'], label='Training Loss')
plt.plot(histroy.history['val_loss'], label='Validation Loss')
plt.ylim([0, 1.0])
plt.legend(loc='upper right')
plt.title('Training and Validation Loss')
plt.xlabel('epoch')
plt.show()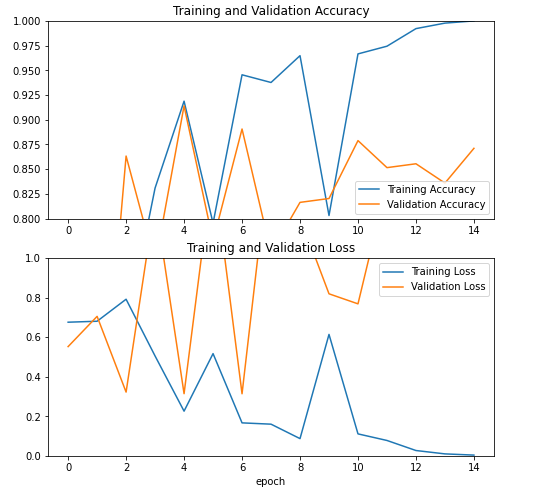
'Data Analysis > Tensorflow' 카테고리의 다른 글
| [tensorflow] sunspots (0) | 2021.01.04 |
|---|---|
| [tensorflow] sarcasm (0) | 2021.01.03 |
| [tensorflow] Fashion MNIST (0) | 2020.12.30 |
| [tensorflow] Basic / Simple model (0) | 2020.12.30 |
| [tensorflow] pycharm 설치 및 환경설정 (0) | 2020.12.18 |
