
CNN 영상 자동 모자이크 프로젝트를 진행했었습니다.
OpenCV를 통해 모든 얼굴을 모자이크 한 영상에 CNN 분류기를 적용시켜 특정 인물 모자이크 제거했습니다.
학습시킬 사람 1명의 190장 얼굴 이미지와 학습시킬 사람을 제외한 나머지 550장 얼굴 이미지
128×128 픽셀로 변환시킨 다음에 7:3 으로 train_test_split하였습니다.
import tensorflow as tf
import random
import glob
import numpy as np
import os.path as path
import cv2
import matplotlib.pyplot as plt

tf.random.set_seed(123)

def load_img (img_path):
    image_path=img_path
    file_path=glob.glob(path.join(image_path, '*.png'))

    #파일 이름에 맞는 이미지 불러오기
    images=[cv2.imread(path, cv2.IMREAD_ANYCOLOR) for path in file_path]
    images=np.asarray(images, dtype=np.float32)

    # 이미지 값이 0~1이 되도록 이미지 크기를 변경
    images=images/255

    # 이미지이름중 맨 앞 글자를 가져와서 라벨을 만든다
    n_images=images.shape[0]
    labels=[]
    for i in range(n_images):
        filenames=path.basename(file_path[i])[0]
        filenames=int(filenames)
        if filenames == 0:
            filename=[1.,0.]
        else:
            filename=[0.,1.]
        labels.append(filename)
    labels=np.asarray(labels)
    return(images, labels)

d_images, d_labels = load_img('uijoong_face')
none_images, none_labels = load_img('another_face')
데이터를 불러온 다음에 살펴보았습니다.
# train 데이터 만들기
def seperate_train_test (images, labels, rate):
    train_test_split = rate
    n_images = images.shape[0]
    split_index = int(train_test_split*n_images)
    shuffled_indices=np.random.permutation(n_images) #array 셔플
    train_indices=shuffled_indices[0:split_index]
    test_indices=shuffled_indices[split_index:]

    x_train = images[train_indices,:,:]
    y_train = labels[train_indices]
    x_test = images[test_indices,:,:]
    y_test = labels[test_indices]

    return(x_train, y_train, x_test, y_test)

d_x_train, d_y_train, d_x_test, d_y_test = seperate_train_test(d_images, d_labels, 0.7)
none_x_train, none_y_train, none_x_test, none_y_test = seperate_train_test(none_images, none_labels, 0.7)

x_train = np.r_[d_x_train, none_x_train]
y_train = np.r_[d_y_train, none_y_train]
x_test = np.r_[d_x_test, none_x_test]
y_test = np.r_[d_y_test, none_y_test]

plt.figure(figsize=(10,10))
for i in range(20):
    plt.subplot(5,5,i+1)
    plt.xticks([])
    plt.yticks([])
    plt.grid(False)
    plt.imshow(x_train[i], cmap=plt.cm.binary)
    # The CIFAR labels happen to be arrays,
    # which is why you need the extra index
plt.show()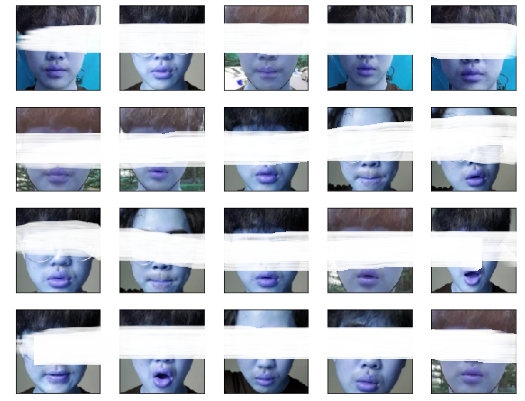
간단한 분류 모델을 만든다음에 adam optimizer를 사용하였고 로스는 binary_crossentropy를 이용하였습니다. 모델의 정확도 확인결과 약 98%가 나왔습니다. 그래프를 보면 과적합이 일어나지 않는것을 볼 수 있습니다.
model = tf.keras.Sequential([
    tf.keras.layers.Conv2D(32, (3, 3), activation='relu', input_shape=(128, 128, 3)),
    tf.keras.layers.MaxPooling2D((2,2)),
    tf.keras.layers.Conv2D(64, (3, 3), activation='relu'),
    tf.keras.layers.MaxPooling2D((2, 2)),
    tf.keras.layers.Conv2D(64, (3, 3), activation='relu'),
    tf.keras.layers.Flatten(),
    tf.keras.layers.Dense(64,activation='relu'),
    tf.keras.layers.Dense(2,activation='softmax')
])

model.summary()

model.compile(optimizer='adam',
              loss='binary_crossentropy',
              metrics=['accuracy'])

hist = model.fit(x_train, y_train, batch_size=128,
                  epochs=10, verbose=1, validation_data=(x_test, y_test))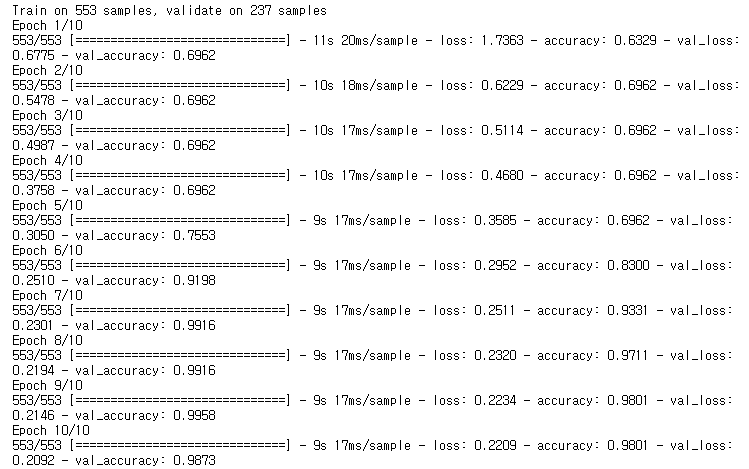
score = model.evaluate(x_test, y_test, verbose=0)
print('Test loss:', score[0])
print('Test accuracy:', score[1])

acc = hist.history['accuracy']
val_acc = hist.history['val_accuracy']

loss = hist.history['loss']
val_loss = hist.history['val_loss']

epochs_range = range(10)

plt.figure(figsize=(8, 8))
plt.subplot(1, 2, 1)
plt.plot(epochs_range, acc, label='Training Accuracy')
plt.plot(epochs_range, val_acc, label='Validation Accuracy')
plt.legend(loc='lower right')
plt.title('Training and Validation Accuracy')

plt.subplot(1, 2, 2)
plt.plot(epochs_range, loss, label='Training Loss')
plt.plot(epochs_range, val_loss, label='Validation Loss')
plt.legend(loc='upper right')
plt.title('Training and Validation Loss')
plt.show()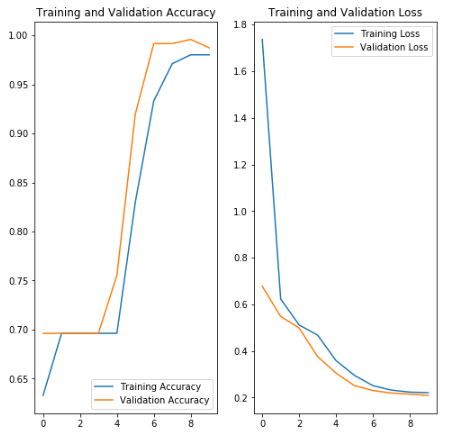
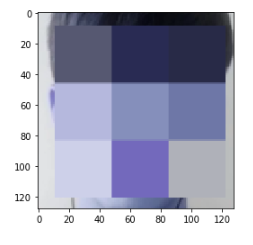
모자이크 처리
먼저 이미지의 색을 흑백으로 전환한 뒤 흑백 상태에서 얼굴을 탐지합니다
얼굴 추출 후 추출한 얼굴을 지정한 배율로 축소 한 뒤 모자이크 처리합니다.
그 후에 모자이크 처리한 이미지를 원래 크기로 복구한 뒤 기존 이미지에 적합시킵니다.
image1 = cv2.imread('0 (250).png')
detector = cv2.CascadeClassifier(cv2.data.haarcascades + 'haarcascade_frontalface_default.xml')
gray = cv2.cvtColor(image1, cv2.COLOR_BGR2GRAY)
faces = detector.detectMultiScale(gray, 1.3, 5)
for (x, y, w, h) in faces:
    roi = image1[y:y+h, x:x+w]
    dst = cv2.resize(roi, dsize=(128, 128), interpolation=cv2.INTER_AREA)
    dst_1 = dst.reshape(1, 49152)

mosaic_rate = 30

face_img = cv2.resize(roi, (w//mosaic_rate, h//mosaic_rate))
# 확대/축소한 그림을 원래 크기로 돌리기
face_img = cv2.resize(face_img, (w, h), interpolation=cv2.INTER_AREA)
# 원래 이미지에 붙이기
image1[y:y+h, x:x+w] = face_img
plt.imshow(image1)
웹카메라
실제 만들어진 영상 데이터를 가지고 학습시킨 CNN분류기를 통과시키면 학습자를 제외하고 모자이크 처리가 잘된 상태로 영상이 저장된걸 알 수 있습니다.
import numpy as np
import cv2

mosaic_rate = 30
detector = cv2.CascadeClassifier(cv2.data.haarcascades + 'haarcascade_frontalface_default.xml')

videofile1 = 'final_test.mp4'
video = cv2.VideoCapture(videofile1)

fourcc = cv2.VideoWriter_fourcc(*'XVID')
writer = cv2.VideoWriter('face_mosaic.avi', fourcc, 30.0, (640, 480))

i=0
ok=0
no=0
while (True):
    ret, img = video.read()
    gray = cv2.cvtColor(img, cv2.COLOR_BGR2GRAY)
    faces = detector.detectMultiScale(gray, 1.3, 5)
    for (x, y, w, h) in faces:
        roi=img[y:y+h, x:x+w]
        dst=cv2.resize(roi, dsize=(128,128),interpolation=cv2.INTER_AREA)
        dst_1=np.expand_dims(dst,0)
        dst_2 = tf.image.convert_image_dtype(dst_2, tf.float32)

        predict = model.predict(dst_2)

        if tf.argmax(predict,1) == 0 :
            no=no+1
            #print('no:',no)

            face_img = cv2.resize(roi, (w//mosaic_rate, h//mosaic_rate))
        # 확대/축소한 그림을 원래 크기로 돌리기
            face_img = cv2.resize(face_img, (w, h), interpolation=cv2.INTER_AREA)
        # 원래 이미지에 붙이기
            img[y:y+h, x:x+w] = face_img

        else :
            ok=ok+1
            #print('ok:', ok)


    cv2.imshow('frame', img)
    writer.write(img)

    if cv2.waitKey(1) & 0xFF == ord('q'):
        break


video.release()
writer.release()
cv2.destroyAllWindows()
'Data Analysis > Tensorflow' 카테고리의 다른 글
| [tensorflow] Basic / Simple model (0) | 2020.12.30 |
|---|---|
| [tensorflow] pycharm 설치 및 환경설정 (0) | 2020.12.18 |
| [tensorflow] iris data (0) | 2020.01.14 |
| [tensorflow][cnn] image classification - mnist (0) | 2020.01.13 |
| [tensorflow] image classification - fashion_mnist (0) | 2020.01.13 |